Blank mugs with your designs & sublimation
 Sublimation mug printing – create your own products
Creating your own artwork can be an extremely rewarding experience. It is quite exhilarating to have finished a masterpiece, put down your pen and admire your creative genius. What puts the icing on the cake is to see your finished artwork on a product that can be sold to make your efforts more worthwhile and profitable.
I draw cartoons for a Global Musicians Magazine and decided to produce coffee mugs with my own unique cartoon designs on a brass banding theme.
 I could have paid someone to do the production work but decided that it would be interesting, more fun and ultimately more profitable to make the finished product myself. Admittedly it’s not the best use of my time but in the early stages I wasn’t sure if I could sell enough of the product to justify outsourcing the manufacturing process.
The other huge advantage that you have if you own production line is that you are in total control. You can produce as many for as few mugs of any design you chose. You don’t have to wait for a supplier to print and ship them. If you see a new craze, trend or come up with an innovative design you can be out there with a finished product faster than a speeding bullet!
It was actually quite easy to source and find out how to create the printed mugs.
It took a couple of weeks from start to finish from having nothing but an idea to shipping the printed mugs to customers. Most of that time was taken up trying out and testing the kit.
In this article I will fast track you through the process with my experience, thoughts and tips I picked as I learned through trial and error how to get my designs on a product that would sell.
What is sublimation and what is a sublimation coating?
Sublimation is the process in which a solid changes directly into a gas without passing through the liquid state. In relation to mugs this is known as Dye Sublimation where heat and pressure are applied and the sublimation dye contained on paper (which is the solid) is transferred as a gas onto polymer substrates on the mugs surface.
In simple terms the printed design transfers onto the surface of the mug as a virtually permanent, high resolution print when heat and pressure are applied in a special mug heat press. This permanent print is the sublimation coating which will not chip or peel (unlike other forms of printing).
What equipment do I need for mug sublimation?
The list is fairly straightforward and I have also prepared a separate review of the equipment needed to start up here. When I started I was able to purchase a ‘starter kit’ which allowed for a cheaper startup package – great to take the first few steps. If you are thinking of buying the equipment check out the article I have posted with the equipment I use and recommend [more…]
Design software
To create the design you will need some form of graphics software. I use photoshop and Photoshop Elements which are both superb for putting a great design and lettering together ready to print.
Do you have to have design software?…I am afraid the answer is yes as the design has to be created electronically and uploaded to the printer. However the cost of a basic software package such as Photoshop Elements is quite reasonable if you are pushed on budget.
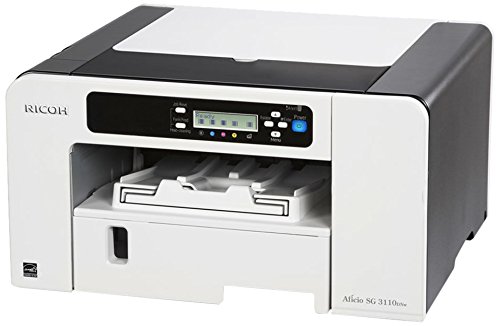 Sublimation Printer
A sublimation printer is really no different to an inkjet printer. The difference is the ink. Sublimation ink is a special suspension of pigment in water that when printed onto sublimation paper can be heated and pressurised so that the sublimation dye changes from a solid (ink on the paper) directly to a gas. The gas created combines with the polymer coating on the mug to create a mirror image of the design on the paper.
The printer is linked to a computer so that the design, created with graphics software can be uploaded ready to print in exactly the same way as any conventional inkjet printer set up.
I use a Ricoh Color Gel printer which I will use to demonstrate in this article. If you wish to look at the exact equipment used please see my recommended sublimation kit items here…
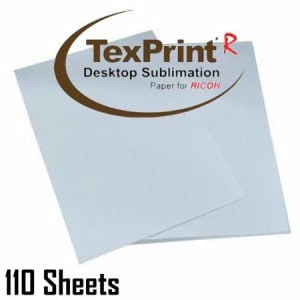 Sublimation paper
Sublimation paper is specially coated to take the sublimation gel ink from the printer. It has two distinct sides normally distinguished by being a slightly darker shade on the ‘non-ink’ side or it will have a brand printed on the non ink side.
 Blank mugs
Blank mugs come in all shapes and sizes but for the purpose of this article and to keep it simple we will be looking at a basic 10oz cylindrical ceramic mug. it is easy to create the images as the designs are rectangular. It gets a bit more complicated when designing for conical mugs.
Heat resistant tape
To attach the paper/ink design to the mug you need a heat resistant tape as normal tape will simply shrivel, melt or even stick to the mug. A roll of heat resistant tape will last a long time as you only use a small piece for each mug.
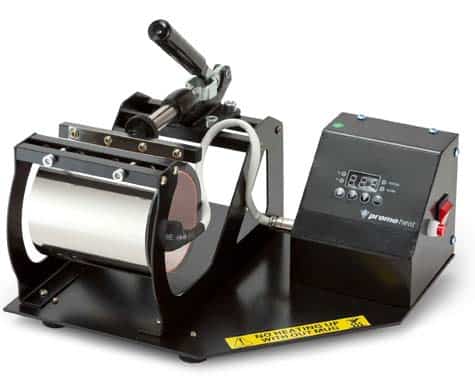 Mug heat press machine
This is a pretty basic piece of kit consisting of a cylindrical heating element contained within a clamp, attached to a control panel. The control panel has very basic settings – temperature and time. Simple to use but I found it tricky to get the timings and temperature right for the best mug prints. Don’t worry – the dozen wasted mugs that i had to throw out were not trashed in vain as I will show you the optimum settings so you don’t have to endure the same experience!
Packaging
If you are going to sell your wares or even give them away they will need to be packaged so they can stand up to the rigours of the postal service. Fortunately there is purpose made packaging for mugs and I will show you some options.
How to design and create a mug template
 Calculating the mug print area
The available print area is governed by the surface area of the heating element wrap that surrounds the mug in the mug press. Just bear in mind that the heat disperses at the edges so the design needs to sit inside heating element wrap or it will not sublimate onto the mug correctly.
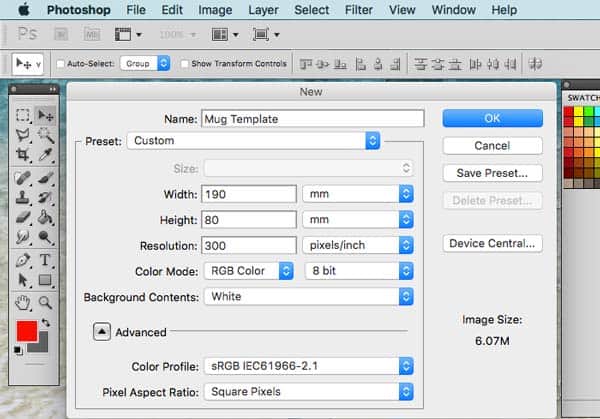
The size of the mug template is easily found by measuring the height of the mug and then deducting 3mm top and bottom. The width is found by measuring the circumference of the mug to within 8mm of the handle (on both sides of the handle). For a 10oz cylindrical mug I have found that a template size of 190mm x 80mm works best. However there is always variation in size so measuring the blank mugs you have purchased is vital.
Setting up the template in Photoshop
This will work in all versions of Photoshop and Photoshop Elements.
- Select ‘File’
- Select ‘New’ and a box menu will open
- Insert a ‘Title’
- Select ‘custom’ from the ‘preset’ size menu
- Insert the dimensions – ‘width’ and ‘height’ (from your measurements of the blank mugs available print area – see previous section).
- Set the ‘resolution’ to 300dpi (dots per inch) is set at 300 – which will give high resolution and is the general printing industry standard.
- Make sure the ‘background’ is set to white
The box should look something like this after you have filled out the various sections
- Click ‘OK’ and the correctly sized template will appear.
At this point it may be useful to save this initial version for future mug designs so you don’t have to repeat this process.
Creating the Mug design
Using the layers pallet you can drag in images that you (or others) have created to make your mug design. I am not going to suggest what you should do as that is entirely up to your own artistic judgement and I am not going to go through the entire PhotoShop process as that will be an entire tutorial on its own. There is an excellent article explaining PhotoShop layers which you can see on the following link procartoon.com-photoshop layers explained. However I will include some key points and a some areas you should consider:
You can’t see the whole design at any one time as the mug is cylindrical – so you need to consider the overall design carefully.
You can have a full width image, mirror images on either side of the design or variations of the same image on both side. You also need to think about any white space to make sure the image appears to be balanced in appearance. The beauty of PhotoShop is that you can play around with a design until it looks good in the template area you have created.

Repeating a design is ok on a mug for the reason given above
The design can be duplicated on either side of the mug. I have created a range of brass band mugs with different cartoon musicians. I have placed them as mirror images on either side of the mug with lettering in the mid section and it works for this particular design.

Photographic images don’t always reproduce well during sublimation
I have tried several photos on mug prints with varying success. All I can say is that you will Need to experiment with this.
As a rule of thumb make sure the photos are high resolution (300d.p.i. is the preferred resolution) and not too dark.
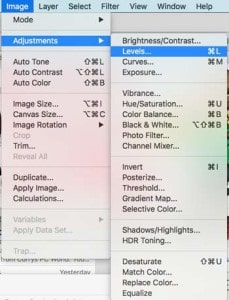
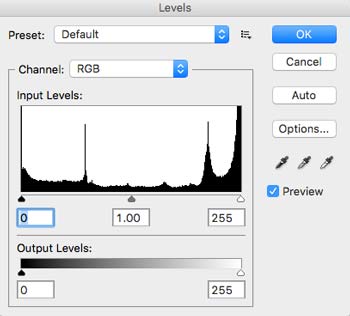
If you find that a photo does not print well try adjusting the image in PhotoShop using the ‘Levels’ feature which is an excellent tool for adjusting the level of darkness and light in an image.
The ‘Levels’ pallet will open and by adjusting the controls on the central slider you can change the light balance on the image.
Poor sublimation from photo’s usually occurs when the image is too dark.
By manipulating ‘levels’ you can lighten up the image and hopefully improve the finished print on the mug.
Fonts
Lettering can be added to the image using the substantial font menu that comes with photoshop or you can import other fonts that you can download from the internet using either as a’paid’ or free fonts. Lettering can then be added, resized, recovered and a variety of effects added such as shadows. Again I am not going to go into this as it would take a tutorial on its own to deal with fonts in PhotoShop.
Reverse the image before you print!
Once you have completed the finished design it has to be flipped horizontally to create a mirror image for the print. Why? – because when the design is attached to the mug and inserted into the mug press it will sublimate a reverse image. To do this in PhotoShop select IMAGE/ROTATE IMAGE/ FLIP CANVAS HORIZONTALLY.
Print size and prints per A4 transfer paper sheet
With an image size of 190mm x 80mm you can print 2 designs per A4 sheet of sublimation transfer paper. To do this you create a new template by selecting FILE/NEW and then from the box that opens give the file a name, select INTERNATIONAL PAPER, select the size A4 and ensure that the resolution is set at 300d.p.i.
With the new A4 template on scree select IMAGE/IMAGE ROTATION/900 CW (clockwise) or 900CCW (counter clockwise) to put it in landscape mode. Drag and drop your mirror image design into the A4 landscape. Then duplicate the layer by right clicking the design layer in the layers pallet and selecting ‘DUPLICATE’ Once a duplicate layer is createde two images can can be positioned one above the other ready for printing.
Printing the mug design
Connect your computer to the sublimation printer and load the printer with sublimation transfer paper. Sublimation paper prints on one side only. Generally the print side is white and the reverse side is either a slightly darker color or carries the papers brand name.
The quality level selected may require some experimentation. However I have found with my Ricoh Color Gel printer the highest quality level works best. This is without using an excessive amount of the sublimation ink gel.
Preparing the mug for printing
Once the sheet has printed cut out design to the exact mug print area you have calculated (in my case it was 190mm x 80mm. Ensure the blank mug is clean and dry. wrap the print around the mug (print facing the mug surface). Position the print so that the edges of the print are spaced equally either side of the handle with the same gaps top and bottom. Join the short edges of the print with a length of the heat resistant tape through the mug handle.
Preparing the mug press for printing
Read the instructions on the press carefully! I didn’t first time round and wasted several mugs as I had not entered the correct settings. I find the following setting work perfectly:
- Set there ‘idle’ temperature to 100oC
- Set the target temperature to 185oC
- Set the timer to 140 seconds
The idle temperature is the temperature the unit will automatically heat up to and stay at when you turn it on. The target temperature is set so that when it is reached it will not go any higher i.e. this is the optimum cure temperature for ceramic mug sublimation (it varies for other products). The timer is set for the maximum cure time that the mug can be subjected to.
The biggest headache I had when I started printing mugs was when to put the mug in the press. I have found that when you set the press to go the temperature rises quickly from idle (100oC) up to the target temperature (185oC).
I usually put the mug into the heating clamp at 1700C. It will continue to rise for about another 3-5oC before the cool mug lowers the temperature of the heating element in the wrap. The temperature will drop about 10oC before starting to rise again but that is ok and no need to worry about it.
Once the temperature reaches 185oC the timer kicks in and 140 seconds later the unit lets out a loud beep. Time to remove the mug from the clamp. Beware that although the mug handle is relatively cool the body of the mug is still at just under 185oC as you take it out of the press.
I put the mug on a silicone mat and very carefully peel back the heat resistant tape and pull off the paper print. You can either leave the mug to air cool naturally or immerse in water. I have done both and either way is ok.
And there you have it – the completed mug done!
Advice to the customer on maintaining the mug design
If you are selling your designer mugs I would advise you to provide some cleaning advice for customers. You often see mugs that have been printed using the sublimation process advertised as ‘dishwasher proof or dishwasher resistant. Heres the facts. The design is dishwasher resistant for a while – a couple of months with regular use. The detergents and particles in dishwasher water will eventually make the design fade.
I state that with every mug that I sell and advise customers to hand wash the mugs. I think that if you tell it as it is customers will appreciate that, get the most out of the product you have sold them and maybe tell their friends and come back for more. If you simply claim they are dishwasher ‘resistant’ or ‘proof’ without advising them to hand wash they won’t have a good user experience and probably won’t come back for future purchases.
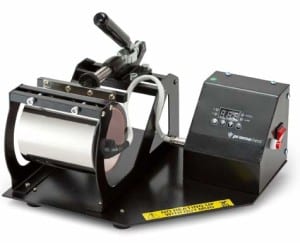 Check out my article on the equipment that I have used and recommend to produce mugs [more…]

